
| HOW TO BUILD NARRATIVE İNFRASTRUCUTRE: ONE STORY AT A TIME | |||||
Quick Start Guide to Recording Narrative İnfrastructure Building narrative infrastructure is a simple process that requires basic computer skills. Ignoring the time needed to coordinate a time to interview your storyteller, the typical oral history interview takes an hour to an hour and a half. Post production (transcription and mapping) takes another two to four hours, depending on how much you can automate the transcription process. |
|||||
| BEFORE THE STORY | |||||
 |
When you want to build a piece of narrative infrastructure, you start by finding someone with a story. He or she could be a friend, a family member, a co-worker, or a teacher -- everyone has stories. | Before you meet together to record their story, you need to get the tools together and check that they are working. It is good practice to have back-up recording devices so that a complete failure of one device does not undo all your work. Use them both at the same time. |  |
||
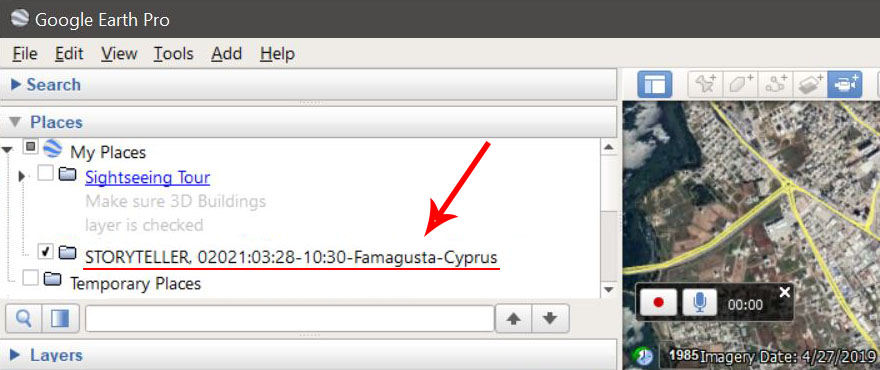
A. The most effective free tool (as of 2021) is Google Earth (GE) "tours". When you start GE, make a new folder under "My Places" and name the folder for the date and name of the storyteller. B. Test your microphone to make sure GE is listening to you. It is best to use a microphone the speaker can hold, not your internal microphone of your device. C. Have the consent form and survey form in both printed format and a digital version. |
 |
||||
RECORDING THE STORY |
|||||
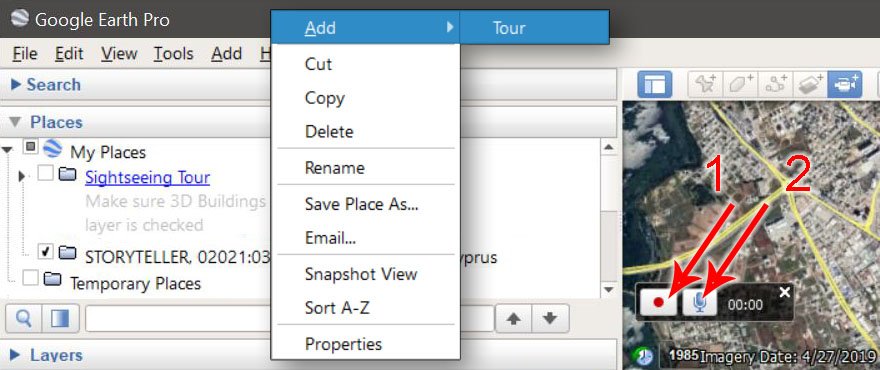
1. Search the town or place that your storyteller is going to talk about. 2. Right-click on their folder, highlight "Add" and select "Tour". 3. Two small buttons will appear in the lower left corner of the screen. First press the red button, then the blue button. You are now recording both the map and the voice! Say a couple of words into the microphone and move the map around. Press the red button again, and replay the tour you just made to ensure you hear your voice on the recording. Click the x to discard that tour and begin again. |
 |
||||
| 4. Restart your tour (2 above), introduce yourself, the speaker, and say the date and time and location of your recording. | |||||
 |
5. Now your storyteller can begin at their own pace. As they tell you stories, be sure to ask where they are talking about. Use the the map to zoom in on the city block they are talking about (or equivalent area). Ask them if this looks like the right place, and if they say yes, ask them to continue. As soon as you think you hear them moving onto another story or another part of the story in a different location, ask for their help to get the location correct. (tip, you don't need to track the story over every meter. Stories tend to have once place that the teller thinks anchors the story in their mind. That spot is the part of the story associated with space.) |  |
|||
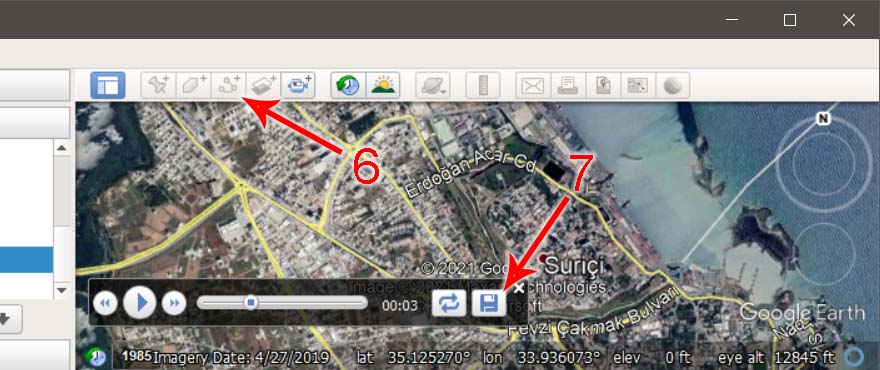
6. If the story is about a journey (like along a path from home to school), us the "path" tool instead of the pin button. Ask for the storyteller's help picking the starting point, the turns in the path, and the end point. 7. When they are done telling their story, click the red button again, and wait while GE loads the "tour", and immediately hit the save icon. Name the tour for the teller and the date. Later you can also add photos of their consent form, and a picture of them or you both (a picture of both of you is a best practice). |
 |
||||
| 8. Thank your teller, and conclude your interview. | |||||
| POST PRODUCTION | |||||
| Transcription In GE: | Listen again to your tour by clicking on it. As the speaker talks, type every word you hear, and every word you say. Be sure to start a new paragraph and add the name when the speaker changes, and start the paragraph with the speaker name and the time in minutes and seconds on the recording. | ||||
| Transcription Using Software: | Open GE, and right-click on the tour and select "Save Place As". Choose your working directory. Navigate to your working directory and find the tour file with its *name*.kmz. Change the file extension from "kmz" to "zip". Inside that new zip folder, you'll find an .mp3 file that is the audio recording. There are a variety of online tools to transcribe from an audio file. Search what is available using an Internet search, as there are better tools being created all the time. I use Google Voice. Better still (as of 2021) is the software Otter, but you'll want to use that on a mobile device in addition to the GE recording. Once you have this transcription, you'll have to edit it for clarity and add the name of the speakers and the time (minute and second) of the recording when the speaker changes. | ||||
| Geotagging the Story | Once you have the transcript, slowly go through the tour again, but when the speaker is starts talking about a specific place, note down the time in the tour, then close the tour. Click the "Drop Pin" button on the upper left of GE. Drag the pin to exactly the place the storyteller was talking about. Give the pin a name suitable to the theme of the story portion, and copy and paste the portion of the relevant text into the "Description" field, being sure to include the speaker name and the time-stamps from the recording. Replay the tour and continue dropping pins until the story is finished. | ||||
| Make sure all the pins are in the same folder as the tour (drag and drop any that were saved outside the storyteller's folder.) Right-click on the folder and select "add" and "photo". For the consent form, the personal photos, and the survey, add an image of each to record the data with the narrative infrastructure. | 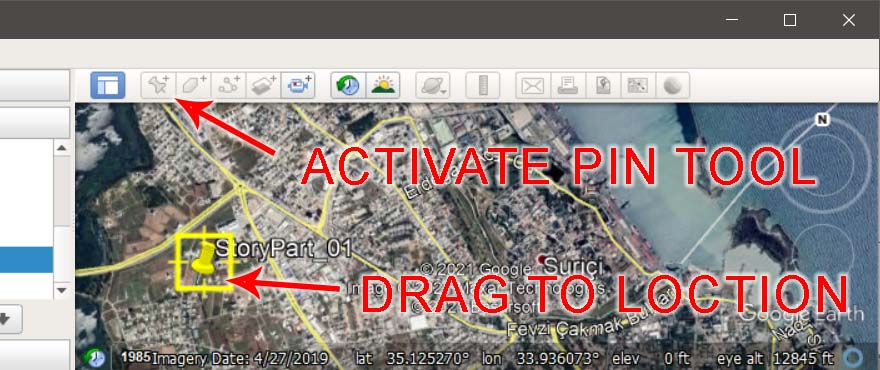 |
||||
Right click on the folder again, and select "Save Place As" and replace your original file in your drive folder. That new kmz file includes the audio recording, the virtual Earth tour, photos, and the pins with the story transcript pieces. At the minimum, save the file both on your hard-drive and on an external drive or cloud storage server. It would be polite to share the file with the storyteller, and ask if they can review the tour for you to make sure you got the locations correct. |
|||||
| ADVANCED POST PRODUCTION | |||||
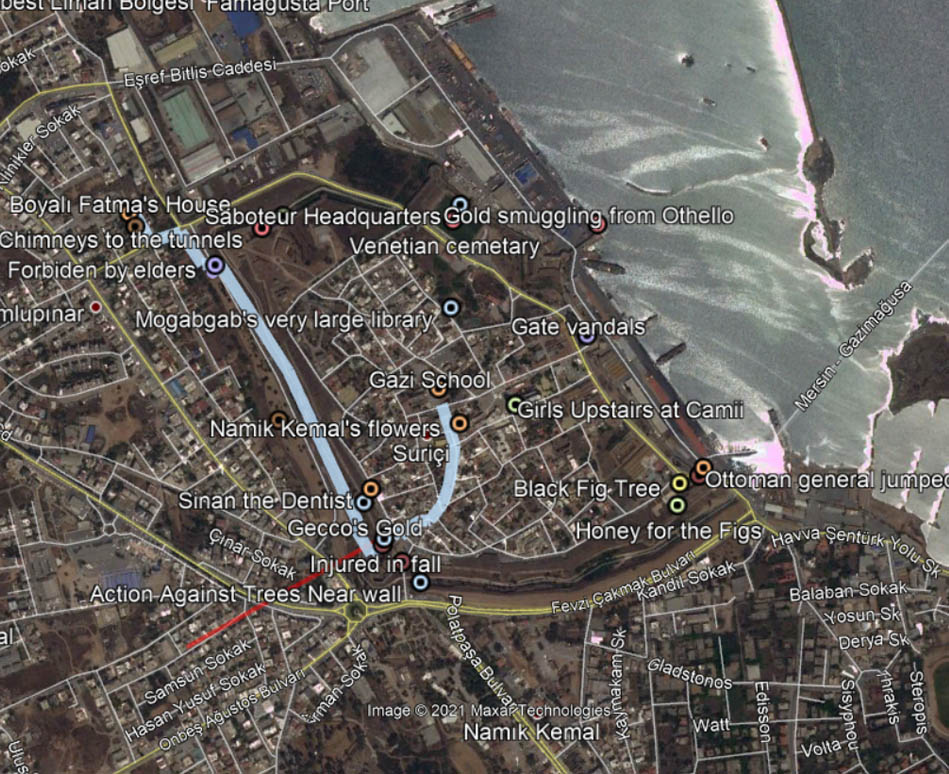
The file you have created is only contains "point-data" and "line-data" locations from the story, so your piece of narrative infrastructure does not have a "service area". Applying a service area requires basic skills in GIS software (such as Qgis or ArcMap). But the data you have collected can be further improved by a GIS professional at any time, so capturing the story with raw locations is the most vital step. This is a mapped oral history in Google Earth, with custom pins: |
 |
||||
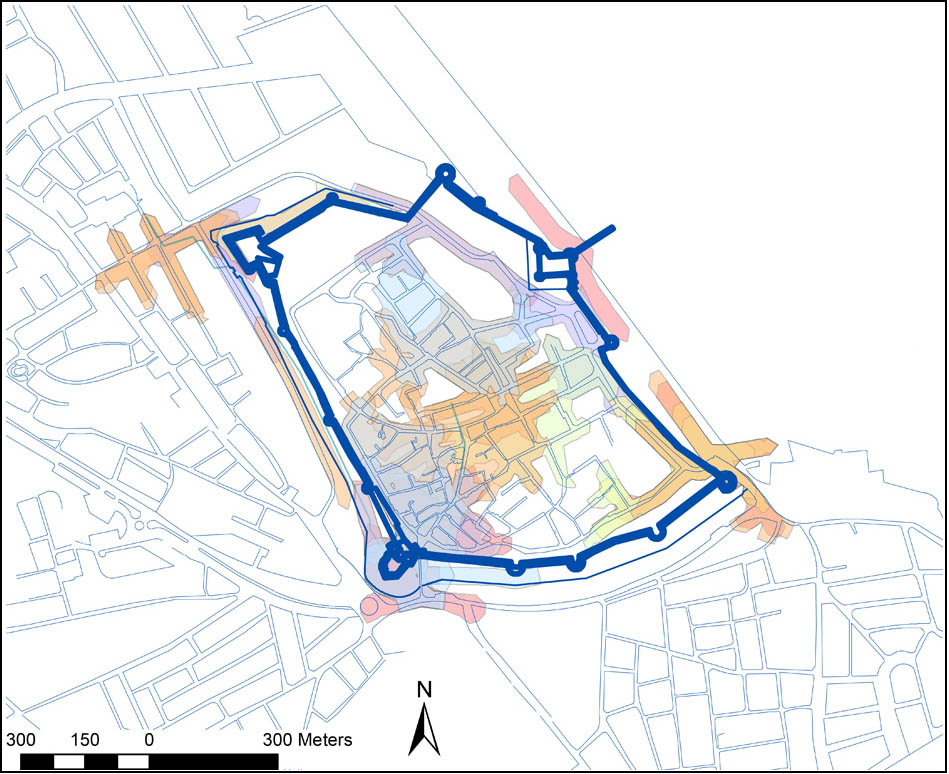
This is the same oral history processed with ArcMap: In an urban setting, a story about one place is usually defined by a service area polygon of 220 meters along the surrounding transportation network (roads and foot-paths) with a 10 meter spread. A story that is about a journey from one place to another is a "story-line" along the path of the teller's story, with a service area of ten meters to either side of the line. |
 |
CHECK LIST | |||
1. Have your consent forms and survey printed 2. Test you mic, and have a second recording device you'll use at the same time 3. Set up your folder 4. Make sure you'll have a live Internet connection during the storytelling 5. Take your team selfy 6. Photograph the consent form and survey 7. Save all your data (including backup recording) on two different drives |
|||||
|
|||||
|
|||||
|
|||||